Quick start
Installation
IsoCor requires Python 3.5 or higher. If you do not have a Python environment configured on your computer, we recommend that you follow the instructions from Anaconda.
Then, open a terminal (e.g. run Anaconda Prompt if you have installed Anaconda) and type:
pip install isocor
You are now ready to start IsoCor.
If this method does not work, you should ask your local system administrator or the IT department “how to install a Python 3 package from PyPi” on your computer.
Alternatives & update
If you know that you do not have permission to install software systemwide,
you can install IsoCor into your user directory using the --user flag:
pip install --user isocor
If you already have a previous version of IsoCor installed, you can upgrade it to the latest version with:
pip install --upgrade isocor
Alternatively, you can also download all sources in a tarball from GitHub, but it will be more difficult to update IsoCor later on.
Usage
Graphical User Interface
To start the Graphical User Interface, type in a terminal (Windows: Anaconda Prompt):
isocor
The IsoCor window will open. If the window fails to open, have a look at our dedicated troubleshooting procedure to solve the problem.
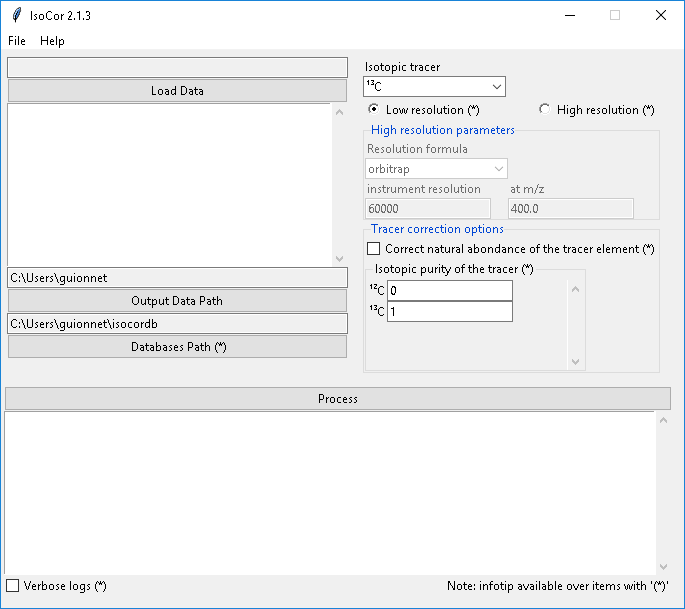
Select the measurements file, modify the correction parameters (isotopic tracer, resolution, etc) according to your experiment,
and click on Process. IsoCor proceeds automatically to the corrections and display its progress
and important messages.
Warning
The correction options must be carefully selected to ensure reliable interpretations of labeling data, as detailed in the Tutorials.
The output of the calculations (i.e. isotopologue distributions) will be written in a text file along a log file.
Note
IsoCor silently overwrites (results and log) files if they already exist. So take care to copy your results elsewhere if you want to protect them from overwriting.
See also
Tutorial First time using IsoCor has example data that you can use to test your installation.
Command Line Interface
To process your data, type in a terminal:
isocorcli [command line options]
Here after the available options with their full names are enumerated and detailed.
usage: isocorcli [-h] [-M M] [-D D] [-I I] -t TRACER [-r RESOLUTION]
                 [-m MZ_OF_RESOLUTION]
                 [-f {orbitrap,ft-icr,constant,datafile}] [-p TRACER_PURITY]
                 [-n] [-v]
                 inputdata
Positional Arguments
- inputdata
measurements file to process
Named Arguments
- -M
path to metabolites database
- -D
path to derivatives database
- -I
path to isotopes database
- -t, --tracer
the isotopic tracer (e.g. “13C”)
- -r, --resolution
HR only: resolution of the mass spectrometer (e.g. “1e4”)
- -m, --mz_of_resolution
HR only: mz at which resolution is given (e.g. “400”)
- -f, --resolution_formula_code
Possible choices: orbitrap, ft-icr, constant, datafile
HR only: spectrometer formula code
- -p, --tracer_purity
purity vector of the tracer
- -n, --correct_NA_tracer
flag to correct tracer natural abundance
- -v, --verbose
flag to enable verbose logs
IsoCor proceeds automatically to the corrections and display its progress and important messages.
Warning
The correction options must be carefully selected to ensure reliable interpretations of labeling data, as detailed in the Tutorials.
See also
Tutorial First time using IsoCor has example data that you can use to test your installation.
Library
IsoCor is also available as a library (a Python module) that you can import directly in your Python scripts:
import isocor
See also
Have a look at our library showcase if you are interested into this experimental feature.